Whenever you create a new invoice, picking slip or quote, or recall an existing one, Micronet displays the Invoice Header screen where you enter the main details of the order.
Refer to "Creating a New Invoice, Picking Slip or Quote" or "Recalling an Invoice, Picking Slip or Quote".
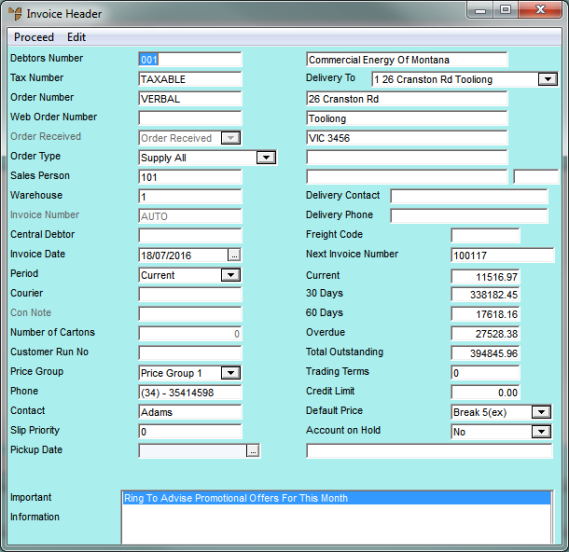
Micronet displays the Invoice Header.
|
|
Field |
Value |
|
|
Debtors Number |
Micronet displays the ID and description of the debtor you entered on the Invoice Creation screen. |
|
|

|
Technical Tip If you change the debtor on an invoice/sales order that already has lines added, and your user ID has security to change invoice pricing, Micronet displays a message asking if you want to reprice the invoice/sales order. Selecting Yes reprices the invoice/sales order lines to the default pricing and discounts for the new debtor. Selecting No retains the existing pricing and discounts. If your user ID does not have sufficient security to change invoice pricing, Micronet automatically reprices the invoice/sales order lines to the default pricing and discounts for the new debtor. The user security for this option is set in the Override Invoice Pricing field on your user ID – see "Maintenance - Edit UserIDs - 4. MDS Security". |
|
|
Tax Number |
Micronet displays the debtor's default tax number from the Debtor master file (for more information, refer to "File - Debtor - Debtor"). |
|
|
Order Number |
If you are creating an invoice for a cash sale, enter the customer's name for the order number. |
|
|
Web Order Number |
|
|
|
Order Received |
Enter the customer's order number if required. |
|
|
Order Type |
This field is only active if delivery options have been setup on the Delivery Options screen. The options available also depend on what has been setup on that screen. Options may include:
|
|
|

|
Reference
|
|
|
Delivery To |
Micronet displays the customer's postal address. You can select an alternative delivery address if required. Debtor delivery addresses are setup in the Debtor master file (refer to "File - Debtor - Debtor" and "File - Debtor - Delivery"). |
|
|
Freight Code |
Enter a freight code for the order. You can also press spacebar then Enter to select a freight code. You must enter a freight code if you are using SmartFreight. |
|
|
Sales Person |
Micronet displays the default salesperson for this debtor. You can enter a different salesperson for this sale if required. Press Delete then Enter to select a salesperson. |
|
|
Warehouse |
Enter or select the warehouse that the items for this sale are to be supplied from. If this field is greyed, you select a warehouse for each invoice line. (This is set in the Ask for Warehouse Each Line field on the Invoicing Configuration screen - refer to "Edit - Program - Invoicing"). |
|
|
Invoice Number |
If this field is enabled, you can enter the docket number issued to the customer by the sales or service person so that docket books can be logged and tracked against invoices. Micronet checks that you have entered a valid and unused docket number. When the invoice is printed, Micronet automatically writes the details of the invoice to the respective docket in the docket file and flags it as used. |
|
|
|
Reference
|
|
|
Central Debtor | If this debtor has a central debtor for invoicing, Micronet displays the central debtor. |
|
|
Next Invoice Number |
Enter an invoice number if required. Micronet generates your invoice numbers automatically based on whether the Use Warehouse Numbers field is set to a system wide or per warehouse numbering system. For more details on generating invoice numbers automatically, refer to "Edit - Program - General". |
|
|
Invoice Date |
Micronet displays today's date as the invoice date. You can forward date an invoice if you need to and if your system configuration allows it (i.e. print the invoice today even though the invoice is for the next period). To do this, you enter your customer’s sales order and allocate it to the specific forward date that you need. Micronet reserves the invoice number and holds the invoice in a batch until your End of Month (EOM) rollover has been completed. After the EOM rollover, the batched forward-dated invoices can be collected and processed correctly in the new period. If you want to forward date this invoice, enter the date you want the invoice to apply to. For example, if today is 31 October 2010 and you want to keep this period over and delay your EOM rollover, but need to give the customer an invoice dated for November 2010, then you would enter the Invoice Date as 1 November 2010. |
|
|
|
Technical Tip To forward date an invoice, the Allow Forward Dated Invoices field on the Debtors Configuration screen must be set to Yes. Refer to "Edit - Program - Debtors" Please note:
|
|
|
Period |
Select the period you want to post the invoice to on the customer account. |
|
|
Courier |
Enter a courier for this order. You can also press spacebar then Enter to select a courier. You must enter a courier if you are using SmartFreight. |
|
Con Note |
If you are printing courier labels, you can enter the next consignment note number. However, if you process invoices as a batch, Micronet automatically assigns this number during processing. |
|
|
Number of Cartons |
If you know how many cartons this order will be packaged in for courier delivery, enter the number. Micronet uses this number to determine how many labels it needs to print. You must enter the number of cartons if you are using SmartFreight. |
|
|
Customer Run No |
Micronet displays the debtor's default run number for standing orders from the Debtors master file (refer to "File - Debtor - Debtor"). For more information on standing orders, refer to "Sales - Standing Orders". |
|
|
Price Group |
Micronet displays the default price group for the debtor from the Debtors master file (refer to "File - Debtor - Debtor"). |
|
|
Phone |
Micronet displays the default phone number for the debtor from the Debtors master file (refer to "File - Debtor - Debtor"). |
|
|
Contact |
Micronet displays the name of the main contact for this debtor. |
|
|
Slip Priority |
If you are creating a paperless picking slip, enter the slip priority. This determines the order in which the slip appears in the Order Scheduler. Those with a higher priority appear higher up the list so they are picked first. For more information about slip priorities, refer to "Maintaining a Picking Slip (Priority, Picker, etc.) (v2.7)". |
|
|
Pickup Date |
Enter the date for the courier to pickup the order if required. Note that if you have converted a backorder to an invoice, Micronet automatically updates this date with the Pickup Date from the backorder. |
|
|
Current |
Micronet displays the amount owed by this debtor for the current month. |
|
|
30 Days |
Micronet displays the amount owed by this debtor for the previous month. |
|
|
60 Days |
Micronet displays the amount owed by this debtor for two months prior to the current month. |
|
|
Overdue |
Micronet displays any amount owing that is overdue. |
|
|
Total Outstanding |
Micronet displays the total outstanding amount for this debtor. |
|
|
Trading Terms |
Micronet displays any trading terms set for this debtor. |
|
|
Credit Limit |
Micronet displays any credit limit set for this debtor. |
|
|
Default Price |
Micronet displays the default price break for this debtor. |
|
|
Account on Hold |
Micronet displays Yes if this account has been placed on hold, or No if it has not. |
|
|
Important Information |
Micronet displays any added text in the Debtors master file that is assigned to display as important information on invoices. |
Micronet redisplays the Invoice Creation screen.
|
|
|
Technical Tip If a debtor contract applies to the debtor and Micronet displays a message that the contract will expire in X number of days, it is because the contract expiry date falls within the number of days entered in the Review Special Prices field on the Special Price Configuration screen (refer to "Edit - Program - Special Price").
|